Tuesday, July 26, 2011

My Not-So-Authentic-but-Still-Delicious-Enchilada Recipe

Hello friends! I love Mexican flavors and I like to create my own recipes with these flavors. This isn't very authentic, but it is very delicious! It's always a hit my family!

You will need:
3 chicken breasts
1 Onion
1 Bell Pepper (I had green on hand)
1 Serrano Chili
Tortillas
1 can of tomato sauce (you only need the tiny can)
1 jar of taco sauce
1 can of red enchilada sauce
1 pack taco seasoning
Shredded Cheese

First, season the chicken with the taco seasoning (both sides) and then bake it in the oven for 30 minutes at 350 degrees. (you can do this the day before and store it in the refrigerator for quick assembly. 


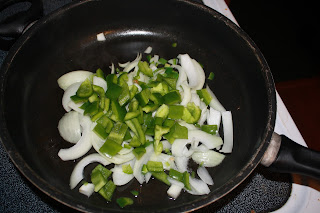
Next, chop up your peppers and onion. Heat a pan with just enough oil to coat the bottom. Once the pan is warm add the peppers and onions. Cook them until they start to get soft.


While the veggies are cooking, chop up your chicken into cubes. One the veggies have started to soften add you chicken to the pan! 


When the chicken has heated through, add just enough of the taco sauce to coat the veggies and chicken. When the sauce gets warmed through you are ready to fill your tortillas.


Scoop some of the meat and veggies mixture and put it in the center of your tortilla. 


Top with some of the shredded cheese.


Fold over each side.


The fold down the top and bottom edge.


Place seam side down into a GREASED or SPRAYED baking dish. 


Repeat the filling until you've filled all of your shells or filled up your pan.


Top the filled tortillas with the can of enchilada sauce, the tomato sauce and the rest of the taco sauce.


Bake uncovered at 350 degrees for 25 minutes. Top with the rest of your shredded cheese and bake for another five minutes and then it's ready to serve!


Wednesday, July 20, 2011

Zoo Time!

Today I took Alex and Andy, my brothers, to the Columbus Zoo and Aquarium. It was probably a little crazy since we're in the middle of a heat wave, but it was still really fun. It's a good thing that the zoo has misters everywhere and dinosaurs that squirt water at you! We had an awesome time until is started to pour down rain, although I must admit that it felt really good after sweating in the sun all day!


Getting ready to see the Manatees!


Posing with the Manatee sign


Sitting with the Manatee Statues!


Alex and Andy love the reptile house!


Some ducks that swarmed us while we were taking a little break.


Not quite the reach of a tiger.


Some fun polar bear shots!


Look at how big those paws are!


Chilling with the brown bear!


This was taken right before the bear started attacking the glass right behind Alex and Andy! Craziness!


Tomorrow I will be posting my not-so-authentic-but-still-delicious enchilada recipe!

Friday, July 15, 2011

Chicken Fresco w/Lemon Vinaigrette Cream Sauce

I am back from my vacation at Kalahari! It was incredible (more on that later) and once I got back I had to get into the kitchen. I love cooking and I just had an itch to get create. I’m not an artist; I can’t draw, sketch or paint, but I feel at my most creative when I’m playing with flavors and ingredients in the kitchen. The following recipe is my take on chicken fresco with a lemon vinaigrette cream sauce, garlic mashed potatoes 
and sautéed zucchini and yellow squash. Since this is an entire meal, I cooked all of these parts at about the same time so if you're going to make all the components you should plan accordingly so that they get done simultaneously. 

Garlic Mashed Potatoes:
You will need:


Potatoes
Milk
Garlic
Butter
Salt 
Pepper

First you should peel, wash and cut up your potatoes.


Next, put them in a pot of water and set them to boil.
Once the potatoes are tender strain them and put them in a large bowl. Add 1.5 tablespoons of minced garlic, salt and pepper to taste, two slabs of butter, and the rest of the heavy whipping cream that you don’t use in the sauce (There may not be enough whipping cream so you might need to add a little bit of milk). Mash the potatoes and then you’re done!

Chicken Fresco:
You will need:
4-6 chicken breasts
Olive oil
Roma tomatoes
Salt
Pepper
Parsley
Garlic salt
Balsamic Vinegar

First you need to soak your chicken in ¼ cup of balsamic vinegar for twenty minutes.


Once you’re ready to start cooking, put just enough olive oil in the bottom of a skillet to coat it and then heat the pan. Once the pan is hot add you chicken and season the chicken with the salt, pepper, garlic salt, and parsley. Cook for about ten minutes and then flip the chicken. Season the other side and cook for another ten minutes or until the chicken is done. Plate the chicken, drizzle the lemon sauce over top the chicken and then add Roma tomato slices on top the chicken.


Lemon vinaigrette cream sauce:
2 tbsp Minced shallots
1 cup white wine
1/4 cup lemon juice
1/3 cup of balsamic vinegar
1/2 cup of heavy whipping cream
1 stick unsalted butter, cubed, at room temperature
Salt

When buying your wine make sure that you pick something that you would drink. If you won't drink it you certainly shouldn't cook with it. I used a Chardonnay and it was really good
To make the lemon butter sauce cook the shallots on medium heat for five minutes then add the wine, lemon juice, and vinegar in a sauce pan. Reduce over medium-high heat for five minutes. Add the heavy cream, and simmer the sauce for 2 or 3 minutes to reduce slightly. Add the butter a few pieces at a time, whisking constantly to blend the butter into the reduction.


The heat should be quite low as you work so that you don’t curdle anything. One the sauce starts to reduce it is ready.


Sautéed Squash and Zucchini:
3 zucchini
2 yellow squash
1 tbs garlic
Olive Oil

First you need to peel and slice the zucchini and squash. 


The coat them with a just a little bit of olive oil and put them in a hot skillet. Once the zucchini and squash start to get soft add the garlic.


Cook them until they’re brown and then you’re ready to plate!


Everyone in my family loved this meal which is pretty much a miracle. It was delicious, fresh, and flavorful. If you try it out I hope you enjoy it!


Tuesday, July 12, 2011

Cherry Pie!

Well, it is official, my pie was delicious! Both my fam and my man really enjoyed it. I would like to start this post off by saying that if you make this pie completely from scratch it is super easy, but it is also pretty labor intensive. If you like to be in the kitchen it’s really fun to make. Don’t worry I will add some shortcuts if you’re in a time crunch, but I find that making the whole thing from scratch is really satisfying.

One way to save time is to use store bought pie crust. If you do have the time I suggest giving making your own dough a try. 

The Dough :
(Makes enough dough for one double, or two single-crust pies)

You will need:


2 1/2 cups flour
1 tablespoon sugar
1 teaspoon salt
2 sticks (8 ounces, 16 tablespoons or 1 cup) unsalted butter, very cold
Cold Water

First fill a glass measuring cup with cold water and a couple of ice cubes. You want the water to be really cold. Set aside.In a large bowl mix the flour, sugar, and salt.

Cut the sticks of butter into cubes.


Add the butter to your bowl and then get out your pastry blender (or a fork) and mix. Use the pastry blender to scoop and redistribute the mixture as needed so all parts are worked evenly. When all of the butter pieces are the size of peas — this won’t take long — stop.


Next add a ½ cup of the cold water (sans ice) to the mixture and combine. You can use a spoon or a spatula, but I do it all by hand. You’ll probably need to add more water to bring it together, but add it one tablespoon at a time. Gather the disparate damp clumps together into one mound, kneading them gently together.


Divide the dough in half and shape into discs. Wrap each on in plastic and then put them in you refrigerator. Try to let it chill for at least an hour.


The Filling:
4 cups pitted fresh cherries (about 2 1/2 pounds unpitted)
4 tablespoons cornstarch
2/3 cup of sugar
1/8 teaspoon salt
Juice of half a lemon
1/4 teaspoon almond extract
½ teaspoon cinnamon
1 egg, beaten with 2 tablespoons water

Preheat oven to 400°F

First you have to pit the cherries. This is by far the most labor intensive part. If this seems daunting or too time consuming you can substitute the fresh cherries with canned, but make sure you get the sour cherries that are not in any type of syrup. DO NOT get canned cherry pie filling. It’s yucky.


Stir together the cherries, cornstarch, sugar, salt, lemon juice, cinnamon, and almond extract gently together in a large bowl.


Assembly:
Roll out half of chilled dough on a floured work surface. Gently place it in the pie pan.


Spoon filling into pie crust!


Roll out the remaining dough on a lightly floured surface, drape it over the filling. Take a knife or pizza cutter and cut the dough into strips. Place five strips on the pie.


Fold back every other strip.


Place one long strip of dough perpendicular to the parallel strips as shown. Unfold the folded strips over the perpendicular strip.


Now take the parallel strips that are running underneath the perpendicular strip and fold them back over the perpendicular strip.. Lay down a second perpendicular strip of dough next to the first strip, with some space between the strips. Unfold the folded parallel strips over the second strip.


Continue this alternation to the edge of the pie then go back to the center and do the same for the other side of the pie.Cut off the extra dough from the strips and then crimp the edge decoratively. Brush the egg wash over the pie crust and then place it in the oven!


Bake the pie in the middle of the oven for 25 minutes. Reduce the temperature to 350°F. and bake the pie for 25 to 30 minutes more, or until the crust is golden. Let the pie cool on a rack.


I'm very happy with the way this pie turned out. My dad has requested an apple pie so I hope to make one soon. I'm also going to try out a recipe for a healthier crust made with coconut oil/shortening instead of butter.